
In all the years that I’ve owned a computer, even back to the time when what I called “my” computer was actually my parents’ computer, there are few things that have remained mostly unchanged. The one that stands out most in my mind is the Printer. Sure, they’ve gotten smaller, more streamlined, and new connectors have been added, but the technology is still basically the same as it was 20 years ago (more like 40 years ago, but someone will probably call me on that). Your computer takes what you tell it to print and converts it to an image-like file using the Printer Driver. It then sends the image to a Printer where it’s applied to paper. You have two flavors, Inkjet and Laser. You either have wet ink applied in thin layers and left to air dry or you have dry ink (toner) applied in thin layers and baked into the paper. When you’re talking about personal and small business class printers, that’s pretty much what you have (I’m not counting special-use printers like Thermal Printers, Impact Printers, Solid Ink Printers, or Dye-Subs).
These printers do have one more thing that hasn’t changed in 20 years, the fact that they tend to be very finicky pieces of technology. Hopefully some of these tips will help when your Printer decides to challenge your right to rule your office.
The Issue
It’s late, you’re at the office and you’re finishing up the Ninja Report. It’s due in the morning and you have to print out all 2,465 pages, but when you send the document to the printer nothing happens. You print it again and still nothing happens. After you’ve had yourself a little cry and re-enacted that scene from Office Space in your mind half-a-dozen times (if you’ve seen the movie you know which one I’m referring to, if not then take a quick look at the picture above of the three men getting ready to do bad things to that poor printer, that’s the scene), what do you do?
First Step
 The first thing that you have to do when you’re working on a printer is check to make sure there’s paper in the tray. I know it’s obvious, I know it’s silly, but you’d be surprised at how often this is the issue. There are a couple more obvious things you need to check.
- Is the printer turned on?
- If there is paper in the tray, is the tray pushed all the way in?
- Is the printer that you’re waiting at the printer that you printed to?
There, 75% of printer troubleshooting is now complete. Ignore these at your own peril, if you call support I garauntee they will check each of these and if they find that it was one of these you will make it onto a list of some sort in their office. I promise you this.
Power Cycle
This promises to be a recurring theme in this series of posts. If you’ve checked the obvious, the next step is to Power Cycle your device. Go back to the post on Self-Troubleshooting: The Internet Is Down and find the section called Power Cycle. There’s an explanation there about why a Power Cycle works. Do it here, reboot your computer and power the printer off and back on.
 Check the Printer
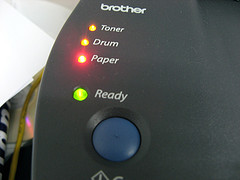
Now we want to take a good look at the printer. Are there any Red, Orange, or Amber colored lights on the printer? This will indicate a physical problem with the printer and support may need to be called if the Power Cycle didn’t fix the issue. If the all the lights are Green then we need to take a look at the back of the printer. You should see at least two cables (rarely more than that) coming out of the back of the printer. One will be the power cord, you have Green Lights so you can ignore that one, the other cable will tell us what kind of interface we’re looking at. Regardless of what kind of cable it is, make sure it’s plugged in all the way into the back of the printer.
If the cable is a Network Cable then it will plug into a Print Server on the back of your printer. Sometimes this print server will have it’s own power supply and it may need to be Power Cycled as well.
Check Your Computer
In this case, “Your” is used loosely. You need to be on the computer that the printer is installed on. If the Interface Cable that you found in the last step has it’s other end plugged into your computer, then that’s where the troubleshooting will continue. If it’s plugged into someone else’s computer, a server, or even into the wall, then it’s time to call Tech Support. You don’t want to mess with someone else’s computer (unless you’re the boss or you have their permission) and I don’t want to be the reason that you are messing with the server. If the computer is your computer or one that you have access to, then by all means, continue on.
Print Spooler Service
If you didn’t reboot, couldn’t reboot, refuse to reboot, or you’re not on the computer that you did reboot then the next step is to restart the Print Spooler Service. The Print Spooler is where the computer keeps the files that it will be sending to the printer. If it gets corrupted or locked up, the all sorts of Printing Issues could pop up. Press and hold the Windows Key and then press R.

This will open the Run window. Type SERVICES.MSC in the Run Window and press Enter. Find Print Spooler in the list, right-click it and choose Restart.

Final Thoughts
Like all Technology Issues, printer problems can be hard to track down and can sometimes be caused by the tiniest flaw in the system. There are many, many more places that a Technician will look as he/she is troubleshooting your issue that are difficult to get to and sometimes dangerous to make changes to. Going through these steps will take care of 90% of printer problems, the other 10% will need to be handled by a professional.
There were some great ideas posted at the end of the last Self-Troubleshooting article, if you have any tips for Printers the please let me know.
Dennis Edmondson Jr
Computing Concepts LLC


